Dehydrating Herbs and Drying Herbs to Preserve Them for Later Use
The science of dehydrating herbs is centuries old. Many people still do it the old-fashioned way by air-drying, but for quicker drying, more modern techniques such as a dehydrator and the microwave are common. Herbs are some of the easiest food supplies to dry and they do not take up a lot of space.
The best time to harvest herbs is in the morning hours, when the fragrance of the fresh plant is highest. This time will vary depending on the plant, as some are ready for cutting and drying just before they start flowering such as basil. The reverse is true for thyme as it is best after flowering. All herbs are suitable for drying, but some processes are more suitable for certain types.
For example, those with long stems or stalks are ideal for air-drying, as they are easy to tie and hang out. The dehydrator is better for those with little or no stems.
Great Herbs for Drying
- Thyme
- Sage
- Rosemary
- Mint
- Oregano
- Basil
- Stevia
Techniques for Dehydrating Herbs
Before drying, you need to clean and prepare them. Wash them by swirling in a bowl of clean water dry them on a strainer or dishrag. Remove leaves and stems that are brown or do not look good. Drying herbs can be slow or fast depending on the process you use. Some of the common processes are:
Air-drying
This is the most popular way to dry herbs. One technique is to put the herbs into net bags and leave them out to dry over time. You can also spread the herbs loosely on paper towels, cover with more paper towel sheets and leave in a cool area with good ventilation. The air drying method is the easiest and works well when there is no electricity or modern kitchen equipment.
Dehydrator
Home food dehydrators make dehydrating herbs a quick and easy process. To protect the essential oils in herbs the heat should be no greater than 100 degrees Fahrenheit. Place the herbs with space between them to allow ample air circulation. When drying herbs with seeds, place them on cheesecloth or other suitable material to prevent the loss of the seeds.
Put the trays into the dehydrators and check periodically, every 30 minutes to two hours. The drying time will depend on the size of the leaves, the stems and of course the type of herb. Once they are dry, remove and put them into airtight containers. You can do more than one type of herb at the same time as the scents and flavors will not mix. With a dehydrator, read the manual to ensure you are using the correct heat settings.
Microwave
This is a good way of dehydrating herbs in small amounts. Some experts remove the leaves from the stem for this drying method. Make sure there is no water on the herbs and place them onto a paper towel sheet (spread sparsely) and cover with another piece.
Microwave for about 2 minutes, checking periodically to prevent burning and remove any pieces that seem to be dry. Place on high heat for best results. If the leaves are soft afterwards, it means there is still moisture, so reheat for about 20-30 seconds and repeat until the leaves are dry.
You can also choose to place the herb in a microwavable container and heat in 30-second increments until dry. This may take up to 3 minutes to work properly.
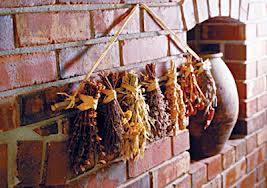
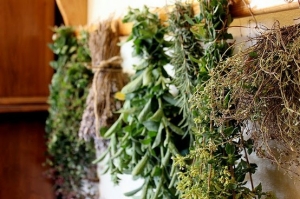
Hand-drying
This is a variation of regular air-drying, and refers to tying the herbs by the stems and hanging them upside down in bunches from a line. Each bunch should have some space between them for air circulation.
Many people hang the herbs in a kitchen to dry, but this is not an ideal location as heat can affect the essential oils and flavors. Hanging your herbs in a dry, dark cellar or room with little direct sunlight but good air circulation works well.
You can use a fan on low setting to enable airflow. The area should be dust free, however, if dust is an issue cover each bunch with a paper bag with the opening facing downwards. Check them every other day, and if they crumble into your hands when you test them, they are dry and ready for storage. If they are powdery, they are too dry and some of the essential oils would be lost.
Herbs are prone to mold and mildew, so they have to be dry if the process is to work well. You need to check frequently for these signs, and after completing the drying process, store your herbs in airtight containers. A dark, cool area will help them maintain their flavor and scent.
Dehydrating herbs means having spices year round, and ensure a supply during shortage. It also makes it possible to have your favorite flavor available to add to meals any time you want. Another reason for drying your own herbs is that you can use processes, which keep the freshness and flavor much better than those you buy in the store. To top it off, drying your own is also a lot less expensive.
Return from Dehydrating Herbs to DIY Survival Food


New! Comments
Have your say about what you just read! Leave me a comment in the box below.