How to Build a Cob Stove - A Primitive Cooking Wood-Fired Stove of Mud and Straw
If you ever wondered how to build a cob stove for personal reasons or survival purposes, now is your chance to learn. You can fabricate this cooking device in a couple of ways so if you find yourself living among nature for a prolonged period, no worries, as either building technique uses easy to find materials. However, it would benefit you to practice creating a cob stove, preferably a portable one, to ensure you can take on this task quickly, easily and if necessary, alone.
Standard

For some people, building a traditional cob stove is easier than trying to piece-meal a small, portable one made from materials in the home instead of those found in Mother Nature. Although more time-consuming, making a standard outdoor stove is simpler because it requires the use of natural products that you can mold and natural elements, such as water and heat, as adhesives.
How to Build a Cob Stove Materials
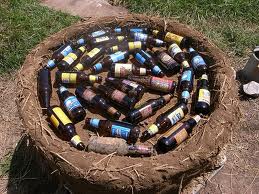
To learn how to build a cob stove using standard techniques, simply start by gathering some sand, bricks, clay, sawdust, cinder blocks and empty beer bottles.
Once you have your materials, you can begin to lay the 22 to 24 inch round cinder block and urbanite foundation, keeping in mind that you want the hearth to be around 40 inches from the ground. After you lay the foundation, add a layer of sawdust, clay mortar and the beer bottles, as this mixture acts as an insulator.
Next, put down the bricks to create the oven floor but when you come to the top level, the one on which your food is going to cook, place a thin layer of sand under these bricks so you can tap them into place, thus making an even and strong cooking surface.

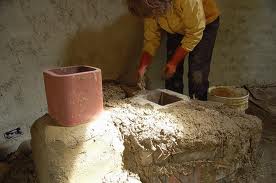
Now that you have built the bulk of the cob stove, you can move on to the more challenging part, which is making the archway. Using a sturdy material that you can place vertically, such as thick cardboard or wood, place the remaining bricks around this piece and fill in the spaces with the remaining clay and sand mortar mixture.
Let the mortar dry and then proceed to build the 16-inch high cob dome by creating a moist sand dome first. Cover the sand dome, which you should build close to the brick arch so the unit is cohesive and has extra support, with wet newspaper and apply a three to one mixture of sand and clay.
To complete the cob stove, wait for the dome to dry and then add an additional two to four inch layer of sawdust and clay slip for insulation. After about a week’s worth of work, time spent waiting for various components to dry and possibly tackling elements other than the sun, you should have a fully functional outdoor oven.
Now that you know how to build a cob stove using traditional tactics, learning to make a portable one with materials found in the home should be a breeze.
Portable
Learning how to build a cob stove that is portable requires less intense physical labor and cheaper materials than the traditional outdoor oven. To start, collect :
- Two, Five Gallon Buckets
- A Shovel
- Utility Knife
- Permanent Marker
- Water and Dirt
- Hay, Straw or Grass
- Two Plastic, Unopened, Two-Liter Soda Bottles
- A Trowel
- Duct Tape
- Rocks
- A Metal Lath Six Inches or Longer
Using the base of the soda bottle as a guide, trace a circle on the side of one bucket, about three to four inches from the bottom, and cut it out. Ensure the soda bottle fits snuggly in the hole then proceed to tape the two bottles together so they form an "L" shape.
Mix the dirt, water and grass, hay or straw in the bucket without the hole to create the cob and begin to fill the other bucket. Stop just below the hole, insert one base of the "L" shaped bottles and then finish filling the bucket. Smooth the top and sides using the trowel, clean any cob seeping out of the hole and leave the mixture to dry for a few days or longer if the climate is humid. Once the cob feels dry, open the soda bottles, empty out the liquid and remove them from the bucket.
The inside of the cob might still be wet, in which case you should set a small fire in the hole using twigs and paper. As soon as the cob is dry, place the rocks on top to create your cooking surface and insert the metal lath into the hole. Place paper inside the hole, under the lath and put wood on top of the screen. Now, light it up and start cooking!
Wherever you go, whatever your situation, knowing how to build a cob stove does not only provide you with delicious dishes, but it can also save your life. If you do not have the time or space to design this outdoor oven prior to a cataclysmic event, be sure to at least have the supplies handy, as well as the instructions.
Return from How to Build a Cob Stove to DIY Projects


New! Comments
Have your say about what you just read! Leave me a comment in the box below.