Build a Solar Oven: Cooking with Solar-Powered Cooking Box
Everybody should know how to build a solar oven out of everyday materials. Of the many types of solar ovens, a box cooker oven is probably the easiest and least expensive to build. It allows you to cook multiple dishes at a time and has room for substantial quantities of food. Materials are easy to come by, you need only basic carpentry skills and you can make one in an afternoon.
Materials and Tools
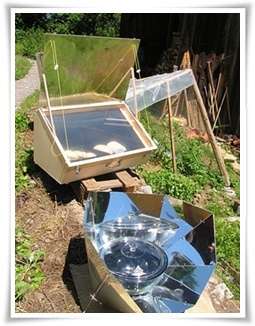
Photo courtesy of Atlas de la Cuisine Solaire
To build a solar oven, you will need the following materials:
- Two large cardboard boxes
Box A, the outer box, needs to be a little larger in all dimensions than box B to allow at least 1 to 2 inches of space between the boxes when assembled.
Box B, the inner box, should be at least 18 x 22 inches and a little bit taller than your pots.
- A lid to fit Box A, or cardboard to make a lid
- Window glass or Plexiglas, at least 20 x 24 inches, longer and wider than box B by 2 to 3 inches
- A thin metal sheet, preferably black, the same size as box B, or slightly smaller
- Black paint and paintbrush, if the metal is not black
- 50 feet of aluminum foil
- Dry plant fibers such as leaves or straw
- At least 50 sheets of newspaper, quartered and crumpled
- Glue or silicone caulk
- A wire hanger or other rigid wire
- Utility knife
- Pencil
- Straightedge
Preparing the Boxes to Build a Solar Oven
Box B will sit inside of Box A, with a couple inches of space between them to add insulation.
- Check the height of the boxes by setting your cooking pot next to both boxes. Box B needs to be a little taller than the pot and box A needs to be a little taller than box B.
- If the boxes are too tall, mark fold lines about 1 inch above the pot on box B and 2 inches above the pot on box A. Score the sides of the boxes with a knife and fold the flaps down to the appropriate height.
- If the metal sheet is not black, paint it black.
- Glue the black metal sheet to the inside of Box B.
- Glue the aluminum foil to the inside walls of Box B. The layer of foil helps insulate the cooker.
- Prepare the lid, if Box A does not have a lid.
- Cut a flap opening in the lid the size of Box B, two short cuts and one long cut, leaving a 2- to 3- inch rim between the flap and the edge of the lid.
- Fold up the resulting flap for the reflector, creating a window-frame opening the same size as box B.
- Turn the lid upside down and glue the glass or Plexiglas to the inside rim of the lid. Press the glass firmly onto the lid creating a good seal.
- Let the lid dry for a couple of hours.
- Glue foil to the inside of the flap.
Preparing the Lid
If you need to make a lid:
- Take the lid piece of cardboard and trace around box A to make fold lines.
- Make a cut at each corner of the cardboard up the fold lines, parallel to the long side of the lid.
- Score the fold lines with a blunt edge and fold along the creases. A board or straightedge will help make straight folds.
- Overlap the corners and glue them together. Use clothespins or a clamp to hold the corners until the glue is dry.
Making an Adjustable Prop
When you build a solar oven, you will need a prop for the lid.
- Glue a small strip of corrugated cardboard to the lid and reflector.
- Insert a piece of wire into any of the notches in the cardboard to allow for different angles of adjustment.
Assembling the Solar Oven
- Set Box B inside Box A.
- Add insulation to the space between the two boxes. Use newspaper, leaves or other dry brush to loosely fill the gaps.
- Put the lid on and open the reflector flap.
- Aim the cooker toward the sun with the lid propped open for several hours to get rid of any moisture and paint or glue fumes.
Once you know how to build a solar oven, the process is simple. With a couple of boxes and some simple materials, you can provide for your survival in a time of need.
Return from Build a Solar Oven to DIY Projects


New! Comments
Have your say about what you just read! Leave me a comment in the box below.